To be able to have the items appear in Idealpos, you need to create Stock Items that match the Fuel Grades entered in the FC6000.
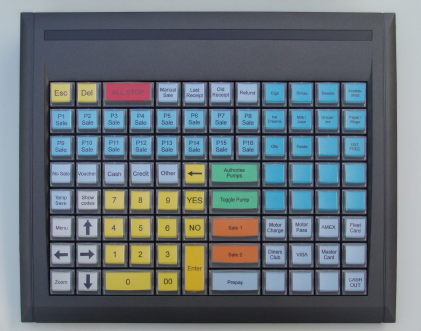
On the FC6000 keyboard press Menu > 4 (Prices) > Take note of each fuel type, the price and the Fuel Grade #.

In Idealpos go to File > Stock Control > Stock Items > Add.
Create a stock item for each grade of fuel that you will be selling.
The Stock Code must be the same as the Fuel Grade from the FC6000, omitting the leading 0.
So in Idealpos your stock codes will be 2, 3 and 4 in this example.
For each Fuel Stock Item go to General > Other Options > tick Scale and enter Ltr.

Go to Setup > Yes/No Options > Miscellaneous > Gilbarco Interface uses Stock Items > tick for all terminals using the FC6000 console.

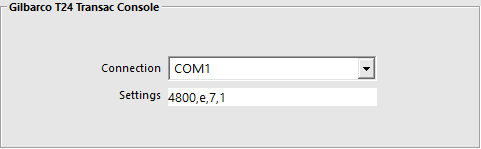
Go to Setup > POS Terminals > Modify > Other Peripherals > Gilbarco T24 Transac Console > Connection: COM port the device plugs into on the terminal > Settings: 4800,e,7,1. Repeat for each terminal using this interface.
Go to Setup > Licence Gateway > Fuel Transponder FC6000 needs to be included in each terminal’s Options field who will be using this module.
Before the FC6000 can send sales to Idealpos, you need to ensure that a clerk has been logged onto the sale, otherwise the sale will not be received into Idealpos as it’s a one-way interface.
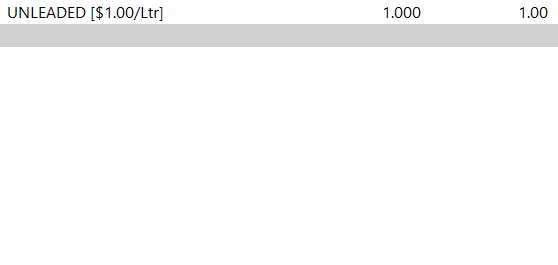
On the FC6000 keyboard > press Manual Sale > select Pump Number (P2 Sale, P3 Sale etc.) > Enter > press Yes to confirm > enter 100 (this is 1L) > Enter > enter 100 (this is $1) > Enter > select Pump Number to bring sale down > press 36 > Enter.
On Idealpos > Login a Clerk.
If possible it is a good idea to have a clerk auto-logon.
This is not secure though, so ensure the service process involves logging a clerk onto Idealpos.
On the FC6000 keyboard > press Yes to confirm the test delivery.